Note: If you don't care about turning the triangles red, you can do this much more easily -- you just create an image map rather than slice up the floor plan image. You add the same javascript code, but not having to worry about slicing the image can make things much easier. However, below I'll describe the whole thing -- but keep in mind that there is a way of making steps 3 and 4 easier.
- Using a graphics program, place little blue triangles at each spot on the floor plan where a picture was taken -- and rotate each triangle so that it faces approximately the same direction the photographer was facing when taking the picture.
Note: For all the graphics manipulation described below, I used Paint Shop Pro, which I find to be somewhat friendlier than Photoshop, a whole lot cheaper, and capable of doing nearly everything I need. For the HTML editing, I used Editpad, which is really just a text editor. Dreamweaver would work just as well.
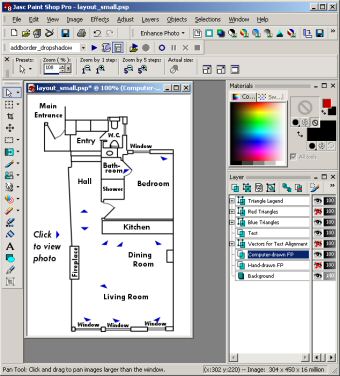
In the floorplan image, create a new layer; if you like, name it something useful like "Blue Triangles." In Paint Shop Pro, create it as a vector layer.
 Click on the shapes tool and select the triangle shape.
 Choose blue as your background color and solid color as your background fill style; choose transparent as your foreground fill style. Make sure "Create as vector" is checked in the tool options palette.
In an empty part of the image, create the triangle you want. Make sure it's not equilateral, so that it will be obvious which direction it's pointing!
 Switch to the Object Selection Tool.
 Using the triangle you just created as a template, you can now create and place the other triangles. Click on the triangle to select it; a box should appear around it. Press Ctrl-C to copy the triangle, and Ctrl-G to paste a new one into the same layer. Place the new triangle at the position of your first photo.
Click and drag the line extending from the selected vector triangle to rotate the triangle to the desired angle.
Rinse, lather, repeat: Make, place, and rotate enough triangles to mark all the positions from which you have taken photos you're including in the photo tour. A sample end result:
Top of Page
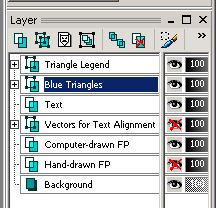 Select the "Blue Triangles" layer.
Right-click on the layer and choose "Duplicate" -- or, from the Layers menu, choose Duplicate.
Re-name the "Copy of Blue Triangles" layer to "Red Triangles." (Right-click on the layer and choose Rename.)
Switch to (or make sure you're using) the Object Selection Tool.
 Expand the Red Triangles layer (click on the "+" sign next to it).
Hold down the shift key as you click to select all the blue triangles in the layer (either click on the image, or click on the "triangle" entries in the layer toolbar).
Once all the triangles are selected, click the blue background color (top right of screenshot above) and change it to red. This should change all the blue triangles on that layer to red.
In preparation for the next step, make sure the Red Triangles layer is visible and the Blue Triangles layer is invisible (click the eye to the right of the layer name to toggle between visible/invisible).
Top of Page
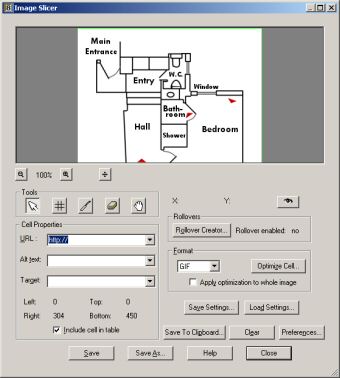 Paint Shop Pro has an image slicer built in, which you can access with: "File | Export | Image Slicer...". Making sure that the red triangle layer is selected and the blue triangle layer is deselected, run the image slicer on your floor plan image.
Note: You can play around with this, since in the end it preserves your original image and creates copies as smaller images. So if you really hate the result, just delete the smaller copies and try again. You won't destroy your original floor plan image.
 First, select "GIF" from the Format box, and click "Apply optimization to whole image". You can click the "Optimize Cell..." button to set the image transparency and color palette, if you want.
Note: jpegs are standard for photos, but for something like a floor plan where you probably don't have that many colors involved, gif is the way to go.
Use the
 slice tool to make rows right above and right below your triangles. Just click and hold at the right horizontal level in the image, and drag the mouse slightly sideways -- the cut will appear as a horizontal line and you can release the mouse when you've got it where you want it. If you make a mistake, either Undo (Ctrl-Z) or use the
  eraser tool to erase a cut line, or the
  hand tool to move cut lines.
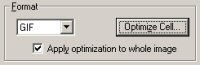
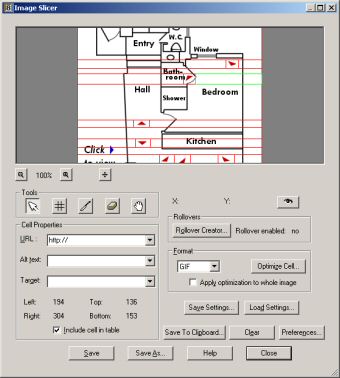 When you've got the rows arranged as you like them so that the rows are fairly tight against each triangle, use the slice tool to create columns around the triangles, so that each triangle has a little box around it. (To create columns, drag the mouse vertically rather than horizontally when you're creating the cut line). Work-in-progress for the floor plan is shown to left.
When you've got all the cut lines where you want them, click the "Save Settings..." button to save the layout of your cut lines. This is an important step! I called the settings "fp_mosaic.jsd".
Click the "Save As..." button. This is where you save not only the little mosaic images that will come from the slices you've created, but also the HTML file where the code to put the pieces back together into the big image. I suggest choosing a short but descriptive name for the html file, and using the same name as the stem for the image files. I used "fp_on.html" and "fp_on" for the HTML Save As and Image Slice Save As prompts:
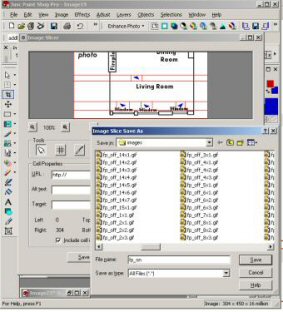 The most important thing about this step is that you save your html files and images in the same directories you intend to store the html files and images when you publish the website, or at least have the same relative directory structure. If you store your html files and images in the same directory, do that here. If, however, you store your html files in C:\MyStuff\html\ and your images in C:\MyStuff\html\images\, make sure you do the same thing with your HTML Save As and your Image Slice Save As. Otherwise, the relative directory paths between the HTML file and the images will be wrong, and while it's not hard to fix, it's a pain in the rear.
Now you should have a file called "fp_on.html" and a bunch of images that start with "fp_on"..., like fp_on_1x1.gif, etc. We will be using these files in the next step, and we will be using some of the gif files in the finished product.
Top of Page
In a web browser, load the fp_on.html file from the File menu; the actual menu command depends on your browser. In Firefox, the command is "File | Open File..." (Get Firefox).
I recommend printing a copy of the floor plan from your browser; if you don't have a printer, sketch a quick diagram with triangles included.
For each triangle, right-click and either choose Properties or View Image. Locate the file name and note the coordinates of the file on your printed/sketched plan next to the triangle in question. For example, if my top-rightmost triangle image is fp_on_2x2.gif, I would write 2x2 next to the top-rightmost triangle on my printout. This will make the next steps much faster.
In your original floor plan image with the two sets of triangles, make the Red Triangles layer invisible and the Blue Triangles layer visible (click on the eyes next to the layer names).
Again, choose "File | Export | Image Slicer..." and this time, click the "Load Settings..." button and load the jsd file you saved (in my case, fp_mosaic.jsd). This should bring up the cut lines already made and the gif image format should now be selected.
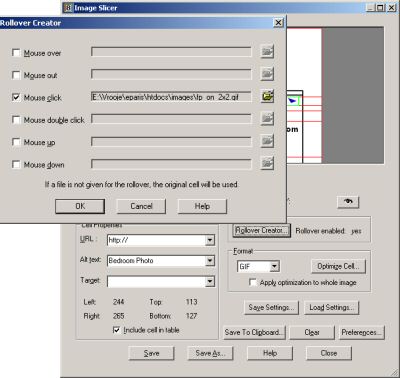 With the triangle cell selected, click the "Rollover Creator..." button.
Check the "Mouse click" line, and click on the little file icon to the right of that line. Here's where writing down those coordinates comes in handy: select the "fp_on_*.gif" which corresponds to the coordinate of the triangle you're working on. So if I'm working on the 2x2 triangle, I would find the image fp_on_2x2.gif and select that for my mouse click image here.
Rinse, lather, repeat: Repeat the three steps above for each of the triangles in your image.
Note: If you want the photos to appear when someone just hovers their mouse over the triangle rather than them having to click on it, do the same thing as above using the "Mouse over" line. For everything that follows, though, I'm going to assume you've chosen the click method.
Run the Save As... steps described above, except this time name the files "fp_off" instead of "fp_on." You'll be using the fp_off.html file quite a bit in the next steps.
Open fp_off.html in your browser and check to make sure that each triangle turns red when you click on it. If you missed one, you can go back and add it by re-doing step 4 (this image slice step). For now, the triangles will stay red even when you click on other triangles; that's what we're going to fix with the next step.
Top of Page
In your HTML/text editor, open fp_off.html (or whatever it is you named it).
Add the following code to the beginning of the file, somewhere between the <HEAD> and </HEAD> tags:
Aside: Don't be afraid of code. It's not that scary. Code is your friend. You can do it.
Within fp_off.html, search for the first line of code that looks like (the numbers may be different):
Scroll up to the "if(document.images) {" line, and paste the text into a new line after "if(document.images) {". To paste, put your cursor at the position you want the new text, and press Ctrl-V. Following the above example, that function should now look like:
Once you're done, you should have several lines in the function restoreall() bit of your code. Mine looks like this:
Now, go to your browser and reload fp_off.html (in some browsers, F5 will refresh the browser, or you can click the refresh button). If nothing happens, hold the shift key down as you click refresh to force a full refresh.
What you should see now when you click each triangle is that that particular triangle turns red, and any triangle that was just red turns back to blue. Great -- you've gotten the floor plan to look the way you want it to look when people click. Now we have to add the actual photos!
Top of Page
Since we want the floor plan to appear at the left and the photos to appear at the right, we need to tell the browser exactly how to do this.
(Aside) I should note here that you can do this very well with CSS, and if that's your preferred method, go to it! I personally prefer tables because there's no problems with different browser interpretations, and they're somewhat more basic than CSS, so even really old browsers have no problem with them. So, my example will use tables. If you're going to do it with CSS, skip this step.
Also, if you would prefer that your photos be displayed below or above the floor plan, you'll also have to modify this step. Displaying below or above the floor plan, though, is a little easier: just insert a
In your HTML/text editor, you will be embedding the HTML code that Paint Shop Pro automatically created within fp_off.html within a little bit of code of your own.
In fp_off.html, look for the lines:
The code between these two lines should take up most of the file fp_off.html. When I refer to it here, I'm not going to show it all -- I'll instead refer to it as:
That blank.gif image is just a place holder: in the next step, we'll be adding small bits of code that will swap the photos you want to show from each triangle.
Top of Page
This step will be no problem for you now that you've done step 5, you code master you.
Speaking of step 5, we'll be modifying the exact same lines of code that we did then.
First: go to the line within the function restoreall():
Now, here comes the most customized part of this instruction: what are the filenames of each photo that you want to show for each triangle? You will need to go back to that printed/sketched floor plan diagram and jot down the filename of each photo next to the triangle in question.
Note: for convenience, I named my photos using the mosaic coordinate form and with the prefix "fp_pic". What this means is that, for example, the photo that shows up at the 2x2 mosaic triangle is called fp_pic_2x2.jpg. I could have just as easily called it bedroom_blahblah.jpg. But for this instruction, I'll assume the filenames are fp_pic_*.jpg. You will need to customize this according to your photo names.
Now, go back to the first line of code that begins with
First, after "if(document.images)", add a left curly bracket "{".
Second, before the last two characters of the line ( the "> characters), add the text "document.rtswap.src='images/fp_pic_2x2.jpg';}". The code should now look like:
Rinse, lather, repeat: Do this for each line that has the "onclick" function in it -- be sure to match up the correct photo filename with the correct triangle using your sketch/printout of the floor plan!
In your browser, refresh fp_off.html and make sure the correct photo appears when you click each triangle!
Top of Page